Document Builder
Access the document builder
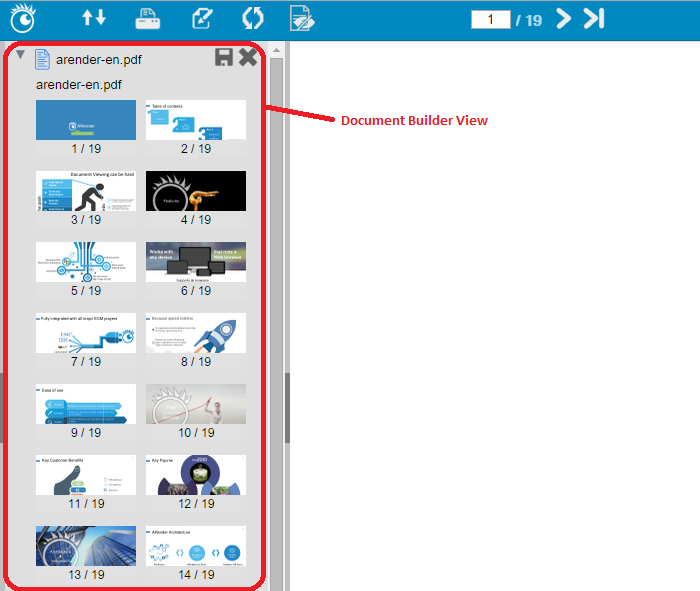
In order to activate the document builder mode, click on the “Scissor” icon:

The document builder mode will now be displayed
You can decide to hide or display source documents by clicking on those following buttons:
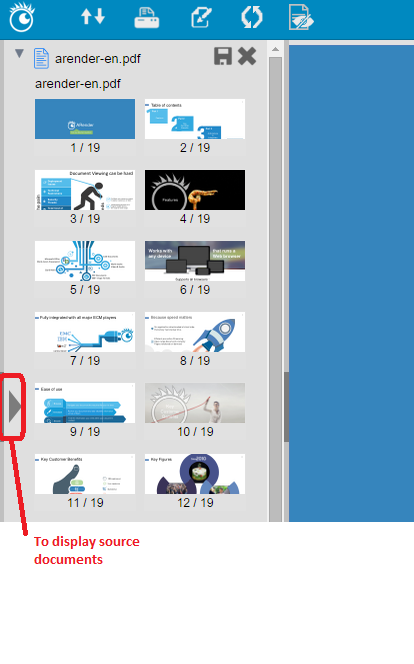
You can also hide or extend source documents by clicking on these buttons:

Create a new document
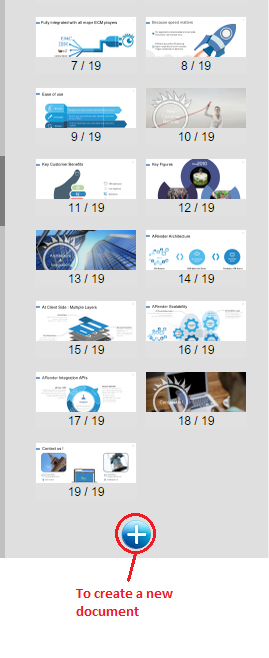
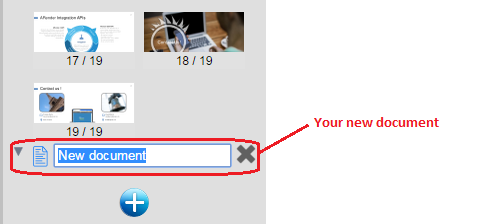
In order to create a new document, click on the " + " button shown in the following picture
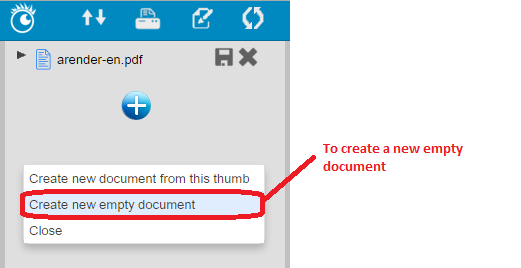
You can also create a new document with a right-click on the document builder view:
You can rename a document by clicking on the title and then typing the new name
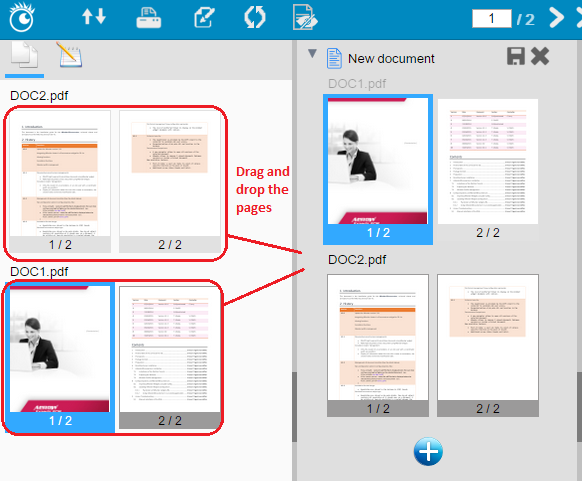
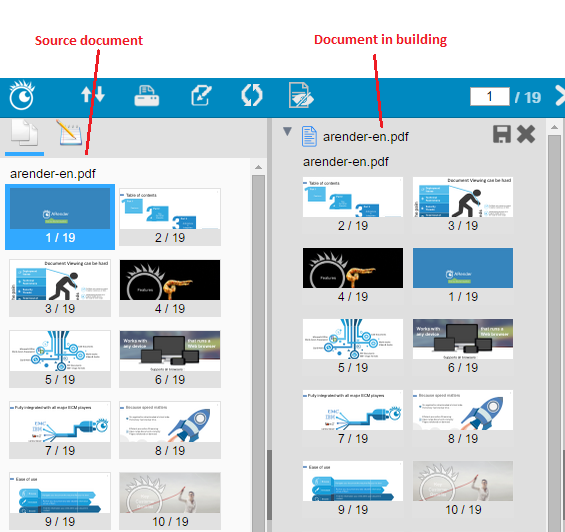
Then, you can add pages to your document, from your other documents. If you want to keep your other documents, you have to drag and drop your pages from the thumbnails navigation, which contains your source documents:
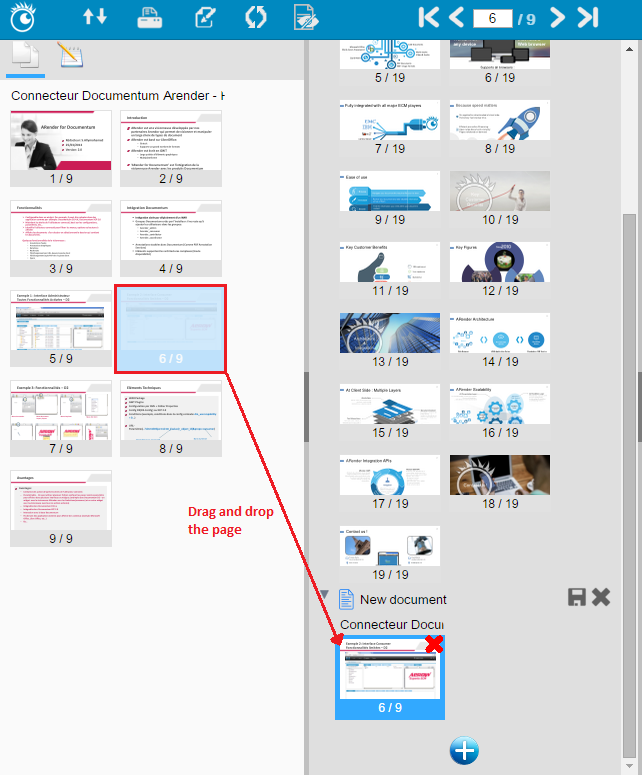
If you do not want to keep your other documents, you can drag and drop your pages from the document builder view. The selected page is no longer in the first document:
You can drag and drop several pages in a row:
- keep « Ctrl » pressed and click on every pages you want to select
- keep « Shift » pressed to select all pages between the first page you clicked on and the second one
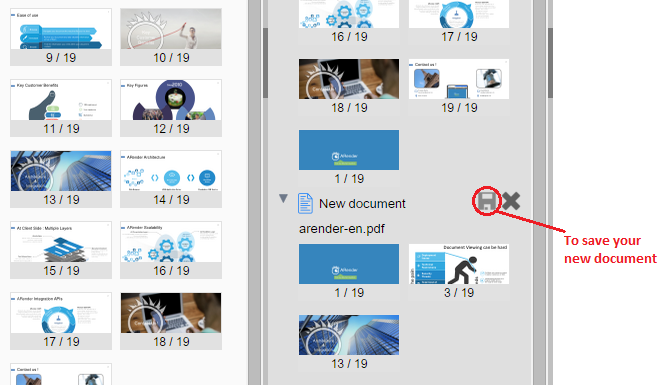
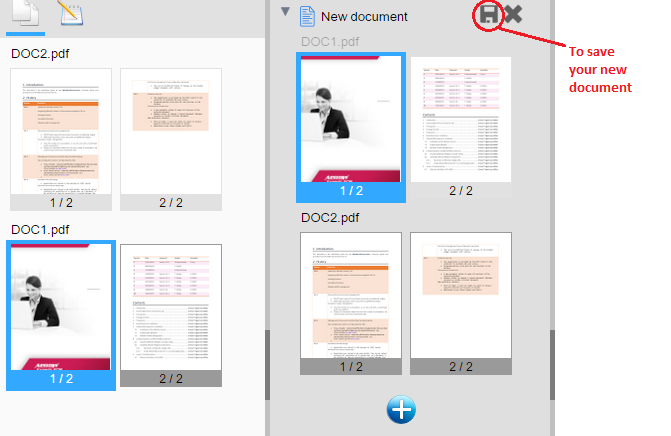
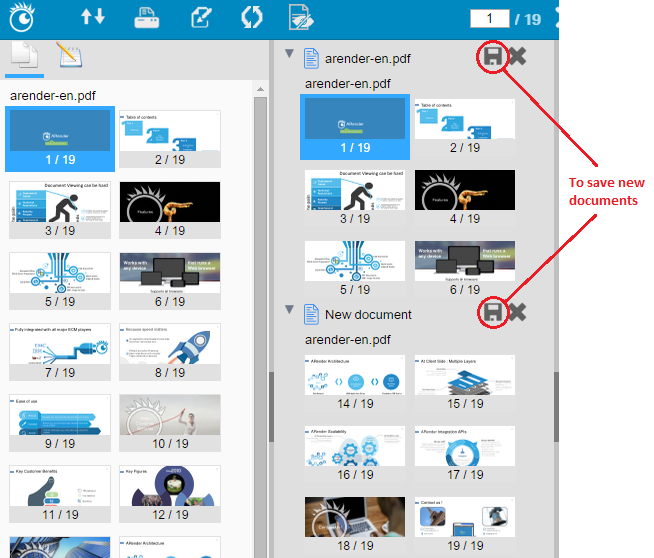
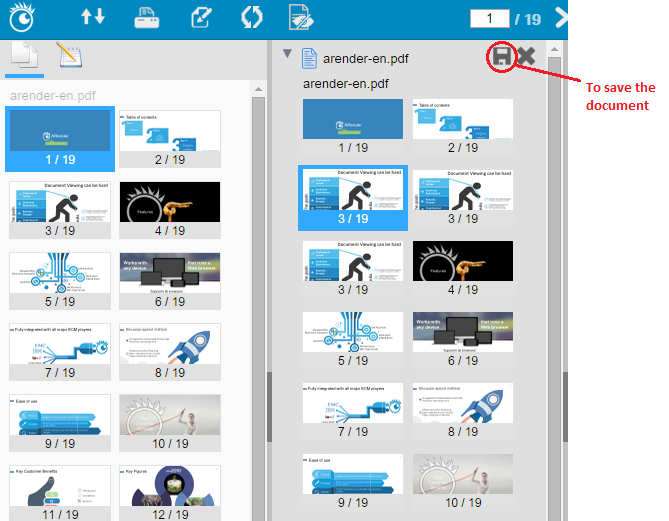
Then, save your new document by clicking on the following icon
The document is now downloaded.
Delete a document from the document builder view
To delete a document from the document builder view, click on the cross corresponding to the document to be deleted:
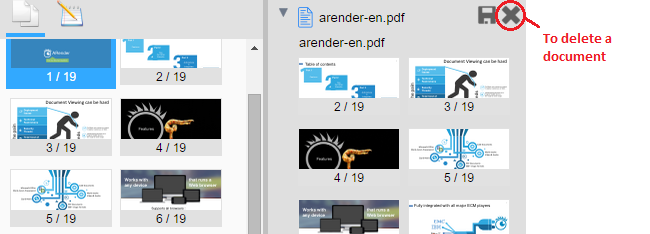
If you delete every pages of a document, the document will be deleted.
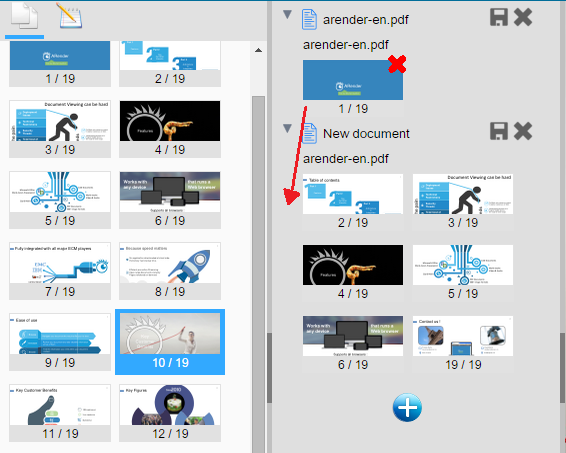
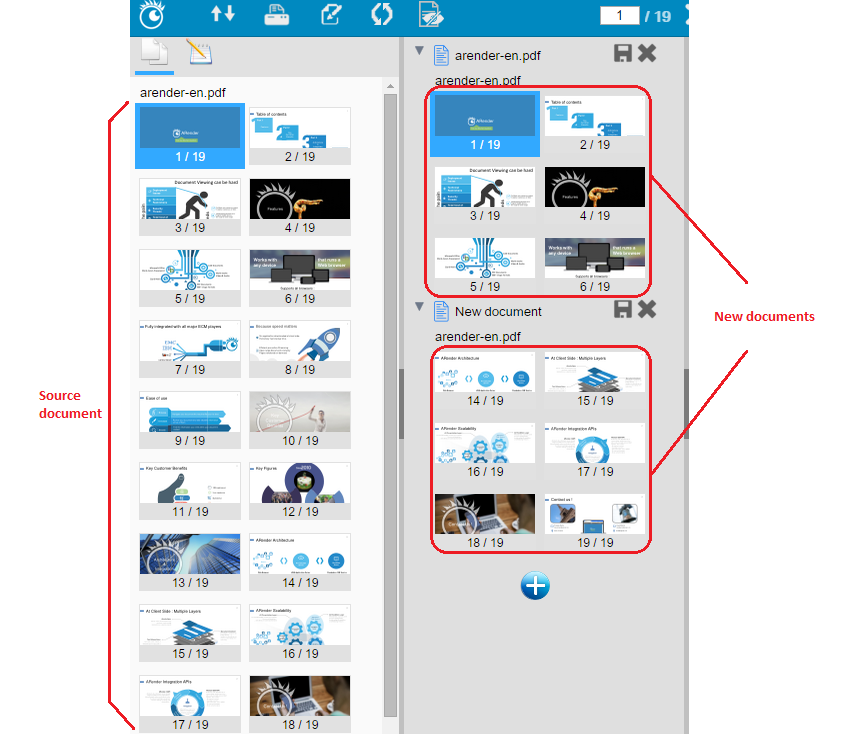
Merge two documents
To merge two or more documents, you have to create a new document
Then, you drag and drop all the pages you want from the source document, to your new document:
Then to save your document, click on the following icon.
Split a document
To split a document in several documents, you have to create your new documents (more information about document creation here). Then drag and drop the pages you want in each new documents.
Then, to save your new documents, click on these following icons
Reshape a document
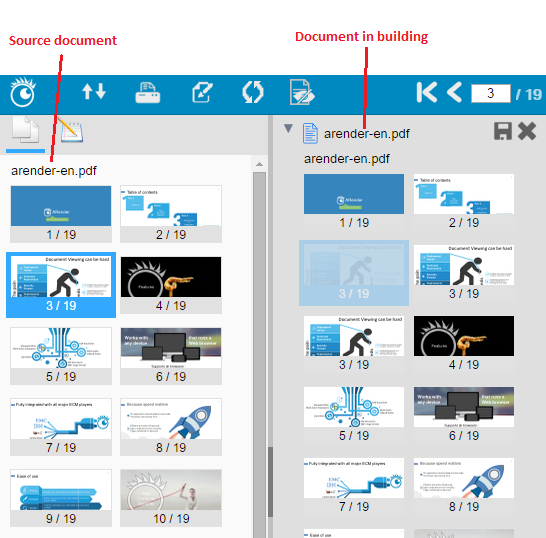
You can move a page into a document with a drag and drop in the document builder view. In this example, the first page is moved to the fourth position:
You can add several times the same page in your document. You have to drag and drop the page from the source document to your document in building. In this example, the third page is added three times:
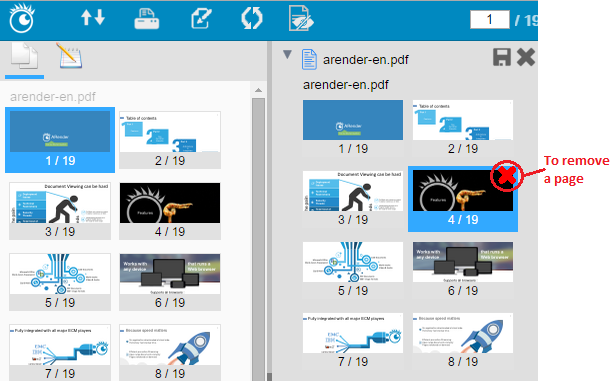
You can delete a page from your document. Click on the red cross on the page to be deleted:
To save your changes, click on the following icon:
Exit the document builder mode
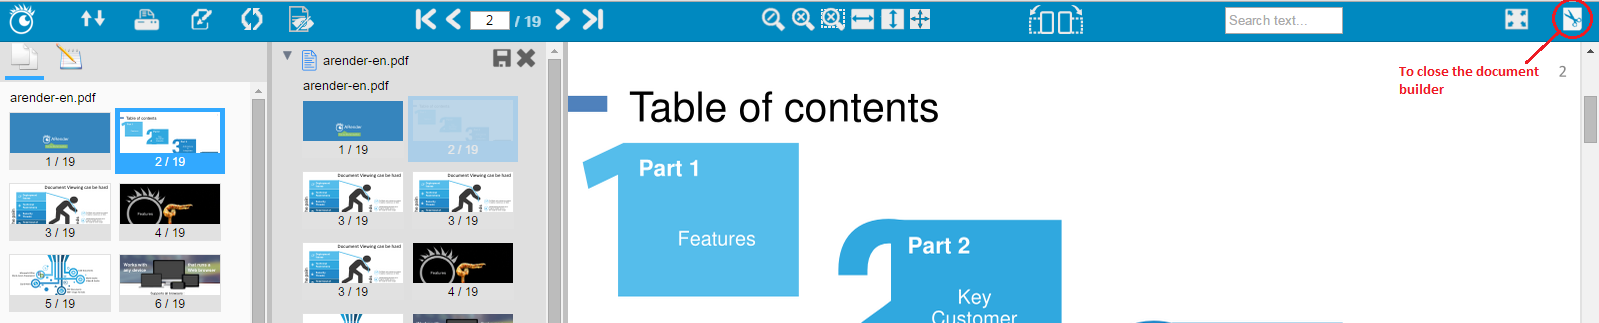
To close the document builder, you click on the “Scissor” icon:
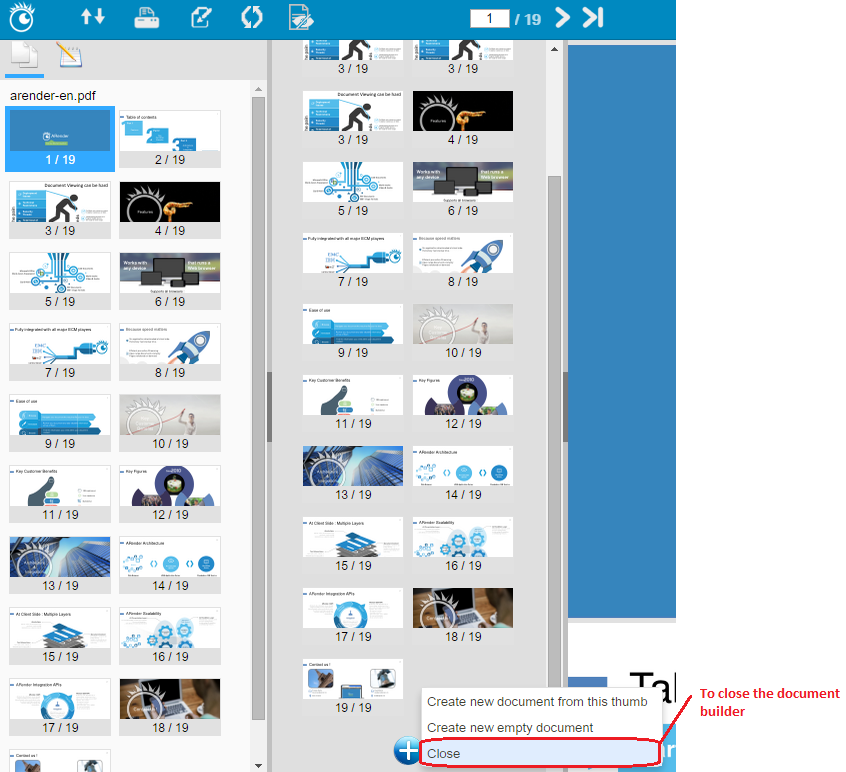
You can also close the document builder with a right-click in the document builder view:
Use custom document builder layout
The custom document builder makes it possible to have automatically a composition of document defined beforehand according to certain data. It allows you to display pages of desired documents. Also, a list of types can be added to the document composition, allowing the document to be typed.
To activate the custom document builder, a set of properties is required :
# Use a script to retrieve custom layout informations to send it to ARender and create it
arenderjs.startupScript=scripts/arendercustomdocumentbuilder.js
# Use the custom populator
documentbuilder.populatorPolicy=CustomDocument
# Enable the saveAll button
documentbuilder.button.saveAll.enabled=true
Javascript code to create a custom layout
To create a custom document, functions calls are made in the ARender startup script. (arenderjs.startupScript property) :
getDocumentBuilder().registerDocumentBuilderOpeningEvent(function(){

});
Allows you to register on the document open event. The main code relating to the creation of the document is therefore done at this moment.
getDocumentBuilder().createCustomDocument(documentBuilderLayoutJSON, optionsJSON);
Creates the personalized document, must be called with two parameters:
- A Json-formatted text representing the custom composition.
- A Json-formatted list of available options. May be empty if document typing is not desired.
getDocumentBuilder().registerDocumentBuilderSaveCustomEvent(function(resultCustomLayoutJSON){

});
Allows you to register on the event of the custom save of the document. A Json object representing the built documents (new IDs, title and type) can be used for the ECM update.
Sample :
function arenderjs_init(arenderjs_) {
    /**
     * Build the custom document builder in ARender
     */
    arenderjs_.getDocumentBuilder().registerDocumentBuilderOpeningEvent(function () {
        let jsonDocumentBuilderLayout = getCustomLayout();                                                      // Retrieve the json format of the custom document builder layout
        let jsonCustomOptionsList = getOptions();                                                               // Retrieve the json format of the custom options set in the data list
        arenderjs_.getDocumentBuilder().createCustomDocument(jsonDocumentBuilderLayout, jsonCustomOptionsList); // Call the createCustomDocument function to build the custom document builder in ARender
    });
    /**
     * Retrieve and log the json format of the custom document builder created in ARender
     */
    arenderjs_.getDocumentBuilder().registerDocumentBuilderSaveCustomEvent(function (resultCustomLayoutJSON) {
        console.info("resultCustomLayoutJSON :\n" + resultCustomLayoutJSON);
    });
}
See the document builder API for more details on the functions used.
The custom document builder layout needs to be retrieved from the server, in a JSON format.
In the same way, a list a custom options needs to be retrieved, in a JSON format.
With these two given parameters, the createCustomDocument function can be called, it will create the custom document builder layout.
At last, a register call is made (registerDocumentBuilderSaveCustomEvent) to get the object called customJsonDocumentBuilderTypeInfo. This object is a JSON format of the custom document builder created, containing title, id and the selected type of created document to be used to update the ECM.
Document builder layout Json format :
The custom document builder layout scheme looks like so :
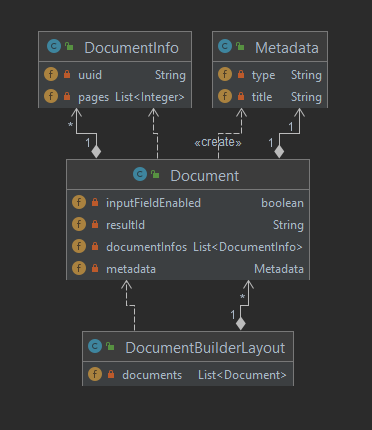
The document builder layout contains several documents (nodes) that contains :
- documentInfos : A list of document information that contains :
- uuid : the original document ID
- pages : list of wanted document page associated to the document ID
- metadata : Data that contains :
- type : the type of the document
- title : the title of the document
Sample :
{
  "documents": [
    {
      "documentInfos": [
        {
          "uuid": "b64_dXJsPS4uXC4uXHNhbXBsZXNcVGVzdF9kZV96aXAzLTAuemlw/1",
          "pages": [
            0
          ]
        },
        {
          "uuid": "b64_dXJsPS4uXC4uXHNhbXBsZXNcVGVzdF9kZV96aXAzLTAuemlw/2",
          "pages": [
            3,
            4,
            5
          ]
        }
      ],
      "metadata": {
        "type": "Accepted Step 2 CS Applications",
        "title": "Accepted Files"
      }
    },
    {
      "documentInfos": [
        {
          "uuid": "b64_dXJsPS4uXC4uXHNhbXBsZXNcVGVzdF9kZV96aXAzLTAuemlw/3",
          "pages": [
            0
          ]
        }
      ],
      "metadata": {
        "type": "Rejected",
        "title": "Rejected Files"
      }
    },
    {
      "documentInfos": [
        {
          "uuid": "b64_dXJsPS4uXC4uXHNhbXBsZXNcVGVzdF9kZV96aXAzLTAuemlw/4",
          "pages": [
            0,
            1
          ]
        }
      ],
      "metadata": {
        "type": "Sample",
        "title": "Sample Files"
      }
    }
  ]
}
This translates in having 3 Nodes in the document builder.
- The first node contains 4 pages, 1 page (page 0) is coming from the document represented by the id b64_dXJsPS4uXC4uXHNhbXBsZXNcVGVzdF9kZV96aXAzLTAuemlw/1. And three pages (pages 3, 4, 5) coming from the document b64_dXJsPS4uXC4uXHNhbXBsZXNcVGVzdF9kZV96aXAzLTAuemlw/2.
- The second node contains 1 page coming from the document b64_dXJsPS4uXC4uXHNhbXBsZXNcVGVzdF9kZV96aXAzLTAuemlw/3
- The third node contains 2 pages (pages 0 and 1) coming from the document b64_dXJsPS4uXC4uXHNhbXBsZXNcVGVzdF9kZV96aXAzLTAuemlw/4
Options Json format :
A list of options is used to fill the drop-down list to set the document type. This list contains several elements represented by a key and a value.
Sample :
[
  {
    "key": "Action Item",
    "value": "Action Item"
  },
  {
    "key": "Accepted Step 2 CS Applications",
    "value": "Accepted Step 2 CS Applications"
  },
  {
    "key": "Account Charges",
    "value": "Account Charges"
  },
  {
    "key": "Archive",
    "value": "Archive"
  }
]
The options are given as proposals to fill the drop-down list.
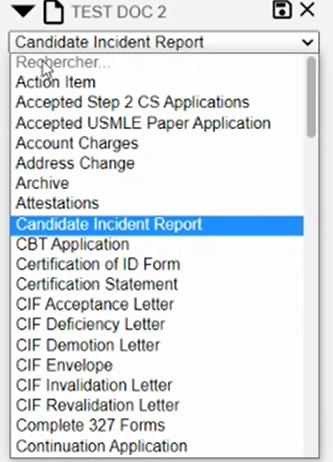
The key attributes of this option list will match the type attribute of the metadata of the json file of the document builder layout. In this example with the previous documentBuilderLayout.json used, the type Accepted Step 2 CS Applications matches the type of the metadata of the first document.
This results in auto completing the drop-down list with the value of this type, Accepted Step 2 CS Applications is then set in the field.
In the others drop-down lists, no given type (Sample or Rejected) is matching any type of metadata, the fields are left empty.
Here is the visual results of the document builder in ARender :
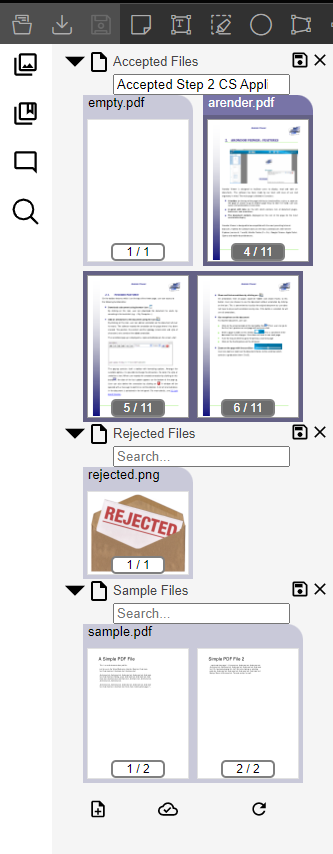
The empty fields can then be filled with desired values or left empty.
Save action
When the save button is pressed, the code given in the registerDocumentBuilderSaveCustomEvent function of the javascript part is executed.
In this example, it will log the json format of the current layout of the document builder.
The returned json format is the same given as input but with one more mandatory object resultId which is the ID of the modified document used to update the ECM.
Here is the returned value of the sample used :
{
  "documents": [
    {
      "resultId" : "e8e653f2-ea1d-40fa-bcf2-f4a95fa238ad",
      "inputFieldEnabled" : "false",
      "documentInfos": [
        {
          "uuid": "b64_dXJsPS4uXC4uXHNhbXBsZXNcVGVzdF9kZV96aXAzLTAuemlw/1",
          "pages": [
            0
          ]
        },
        {
          "uuid": "b64_dXJsPS4uXC4uXHNhbXBsZXNcVGVzdF9kZV96aXAzLTAuemlw/2",
          "pages": [
            3,
            4,
            5
          ]
        }
      ],
      "metadata": {
        "type": "",
        "title": "Sample Files"
      }
    },
    {
      "resultId" : "f09acee7-cf94-48a2-a3ee-47b27f5049b6",
      "inputFieldEnabled" : "true",
      "documentInfos": [
        {
          "uuid": "b64_dXJsPS4uXC4uXHNhbXBsZXNcVGVzdF9kZV96aXAzLTAuemlw/3",
          "pages": [
            0
          ]
        }
      ],
      "metadata": {
        "type": "Rejected",
        "title": "Rejected Files"
      }
    },
    {
      "resultId" : "4ccb15c6-f556-4778-be84-25b492eecc56",
      "inputFieldEnabled" : "true",
      "documentInfos": [
        {
          "uuid": "b64_dXJsPS4uXC4uXHNhbXBsZXNcVGVzdF9kZV96aXAzLTAuemlw/4",
          "pages": [
            0,
            1
          ]
        }
      ],
      "metadata": {
        "type": "Accepted Step 2 CS Applications",
        "title": "Accepted Files"
      }
    }
  ]
}
This data scheme can then be used to update the ECM.