Connector
Welcome to the ARender Connector Development Documentation. This guide will walk you through the process of creating a connector for ARender, with a focus on Java implementation, and the necessary steps to integrate the connector into ARender WEB-UI.
Prerequisites
Required technical knowledge
Before embarking on connector development, ensure that you meet the following prerequisites:
- ARender installation and operation: verify that ARender is correctly installed and operational in your environment.
- Proficiency in Java: connector development is conducted in Java, requiring strong proficiency in the language.
- Knowledge of Maven: the deliverable is constructed (as outlined in this documentation) using Maven (https://maven.apache.org/).
- Understanding of the Target Application: possess knowledge of the application for which you are developing the connector. This includes retrieving documents via a Web Service, managing security for the application, and securing the document retrieval call.
Network infrastructure
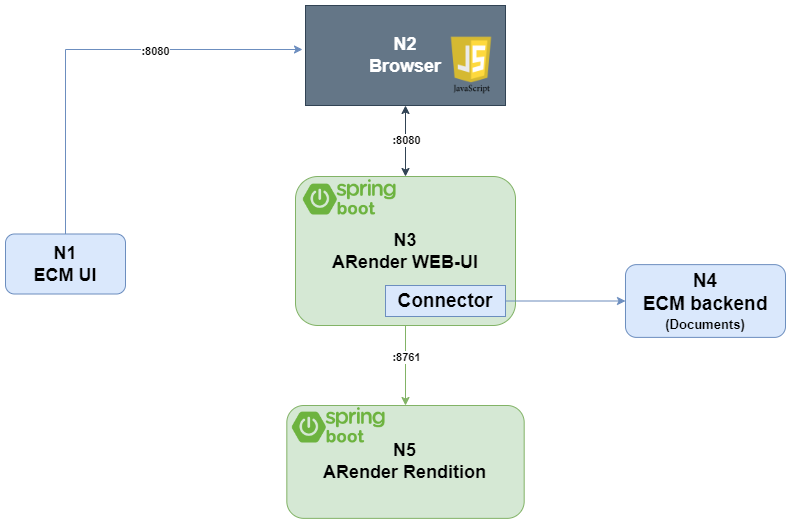
- N1: ECM UI: has the responsibility to let the user choose which documents he wants to open in ARender,
- N2: Browser: will create the ARender frame using the URL provided by N1,
- N3: ARender WEB-UI: Spring Boot module which contains the connector,
- N4: ECM Backend: API with which ARender connector will interact to fetch documents (and if needed fetch annotations fetch metadata and create new documents or new version of documents),
- N5: ARender Rendition: Spring Boot module that will generate images, extract text and more.
As shown in the above diagram, the connector will have to be deployed in N3 WEB-UI.
Part 1: How ARender operates with a connector?
ARender serves as a document rendering tool, capable of integration with various Document Management Systems (DMS) through custom connectors (refer to the list of existing connectors).
A connector empowers ARender to connect with a specific DMS for document retrieval and display. The process unfolds as follows:
-
Opening a URL from the parent application (DMS) with a set of parameters defined in the connector. These parameters typically include information such as document identifier(s) and a security token.
- Example: http://localhost:8080/?id=1234&token=abcd
-
Parsing the URL: Extracting parameters from the URL and selecting the corresponding connector. Once the connector is selected, it sets the ID for each document to display and creates a DocumentAccessor for each.
-
Retrieving documents: The connector employs each DocumentAccessor to retrieve documents from the DMS.
Part 2: Document connector development
Prerequisites
- Access credentials (login/password) for our binary repository (If you don’t have access, please contact us through our ticketing system or via email: arender-sales@arondor.com).
- Java and Maven development environment.
Maven configuration
-
In the Maven configuration file .m2/settings.xml (refer to Maven documentation).
-
Configure the login and password in an XML format as follows:
- Make sure to replace placeholders like loginToReplaceByYours with your actual login credentials.
    <servers>
      <server>
        <id>arondor</id>
        <username>loginToReplaceByYours</username>
        <password>loginToReplaceByYours</password>
      </server>
    </servers>
- Next, configure access to the ARender libraries as shown below:
  <profiles>
  	<profile>
  		<repositories>
  			<repository>
  				<snapshots />
  				<id>arondor</id>
  				<url>https://artifactory.arondor.cloud/artifactory/arondor-all/</url>
  			</repository>
  		</repositories>

  		<pluginRepositories>
  			<pluginRepository>
  				<snapshots />
  				<id>arondor</id>
  				<url>https://artifactory.arondor.cloud/artifactory/arondor-all/</url>
  			</pluginRepository>
  		</pluginRepositories>

  		<id>artifactory</id>
  	</profile>
  </profiles>

  <activeProfiles>
    <activeProfile>artifactory</activeProfile>
  </activeProfiles>
These configurations are essential for setting up the development environment for the ARender document connector.
Development
Introduction
Please find below the how to develop a connector that fetches a document from you ECM system.
An online sample of a connector is available at the following URL: https://github.com/arondor-connectors/sample-connectors/.
DocumentAccessor
The development of a new ARender connector should start with the implementation of the DocumentAccessor interface.
Create a class that implements the following interface: com.arondor.viewer.rendition.api.document.DocumentAccessor.
InputStream getInputStream() throws IOException;
The implementation of this interface should define the service call for retrieving the document.
- Example inline implementation: here.
URLParser
Subsequently, the retrieval of necessary information for DocumentAccessor to retrieve the document must be obtained from the URL. To achieve this:
-
Create a class that implements the following interface: com.arondor.viewer.rendition.api.DocumentServiceURLParser,
- Let’s name it SampleURLParser for the sake of continuity.
-
Two methods need implementation:
boolean canParse(DocumentService documentService, ServletContext application, HttpServletRequest request);
The implementation of this method should return true or false depending on whether the parameters in the URL are sufficient for ARender to retrieve the document.
DocumentId parse(DocumentService documentService, ServletContext application, HttpServletRequest request) throws DocumentNotAvailableException, DocumentFormatNotSupportedException;
The implementation of this method should return the ID of the document to be displayed in the context of ARender.
- Example inline implementation: here.
Part 3: ARender configuration
- Build the JAR package via Maven,
The JAR file should incorporate the essential dependencies required for the connector to seamlessly integrate with the Document Management System (GED).
Similarly, the pom.xml file needs to include the necessary ARender dependencies to ensure the product functions correctly with the specified version. For an online example, please check this page
$> mvn clean install
- Place the JAR in the lib/ directory of ARender WEB-UI,
- Configure the use of the new URLParser developed as a bean by opening configurations/arender-custom-server-integration.xml file, and add the below content:
<bean id="sampleURLParser" class="com.arondor.arender.sample.connector.urlparsers.SampleURLParser" scope="prototype">
</bean>
- Add the new connector, sampleUrlParser, in the list of connectors by updating the configurations/arender-custom-server.properties file like below:
arender.server.url.parsers.beanNames=sampleUrlParser,DefaultURLParser,DocumentIdURLParser,FileattachmentURLParser,ExternalBeanURLParser,AlterContentParser,FallbackURLParser
- Configure the use of the new URLParser developed as a bean by creating a file named arender-custom-server-integration.xml, with the content below:
<?xml version="1.0" encoding="UTF-8"?>
<beans default-lazy-init="true" default-autowire="no"
       xmlns="http://www.springframework.org/schema/beans" xmlns:xsi="http://www.w3.org/2001/XMLSchema-instance"
       xsi:schemaLocation="http://www.springframework.org/schema/beans
        http://www.springframework.org/schema/beans/spring-beans.xsd">

  <!-- xml imported by ARender Java Web Server side, please add any customization you wish to see loaded in this file-->
  <bean id="sampleURLParser" class="com.arondor.arender.sample.connector.urlparsers.SampleURLParser" scope="prototype">
  </bean>
</beans>
- Add the new connector, sampleUrlParser, in the list of connectors by creating a file named arender-custom-server.properties, with the content below:
arender.server.url.parsers.beanNames=sampleUrlParser,DefaultURLParser,DocumentIdURLParser,FileattachmentURLParser,ExternalBeanURLParser,AlterContentParser,FallbackURLParser
- Update the docker-compose.yml adding the below content (please adapt the path with your configuration):
services:
  ui:
    image: artifactory.arondor.cloud:5001/arender-ui-springboot:${VERSION}
    container_name: ui
    volumes:
      - "/home/centos/ar-deployment/docker-compose/arender-connector-${VERSION}.jar:/home/arender/lib/arender-connector-${VERSION}.jar"
      - "/home/centos/ar-deployment/docker-compose/arender-custom-server-integration.xml:/home/arender/configurations/arender-custom-server-integration.xml"
      - "/home/centos/ar-deployment/docker-compose/arender-custom-integration.xml:/home/arender/configurations/arender-custom-integration.xml"
Part 4: Deployment and testing
To test, follow these steps:
- Restart ARender.
- Open a new browser window and load the URL expected by the URLParser defined above.
- Example: http://localhost:8080/?id=1234
- Expected Result:
- The desired document should be displayed in ARender.
Debugging
Refer to this dedicated ARender logs page for debugging information.
Going further - Annotation management
Without specific configuration, ARender will store annotations on the ARender WEB-UI server’s file system. This is not suitable for a production environment.
Therefore, you have two options:
- Use an existing annotation connector (e.g., a connector for storing annotations in a database).
- If this is your choice, you can use the JDBC connector: arondor-arender-jdbc-annotation. A dedicated documentation will be produced soon.
- Develop your own annotation connector. This can be useful for storing annotations close to the documents and
inheriting their security.
- If this is your choice, follow the documentation below.
Part 5: Annotation connector development
Part 5.1: Create a new SerializedAnnotationContent class
An online sample is available here.
When creating your own annotation connector, you need to define how to retrieve and update annotations. To do this, ARender provides an API that defines two methods to implement: get() and update(..).
The main steps to initialize your annotation connector are described below:
- Define class variables.
- Implement the SerializedAnnotationContent Interface.
- Create the constructors.
- Implement the methods.
Define class variables
Two class variables are needed, the logger and the documentId.
private static final Logger LOGGER = Logger.getLogger(SampleSerializedAnnotationContent.class);

private final DocumentId documentId;
Implement the SerializedAnnotationContent Interface
public class SampleSerializedAnnotationContent implements SerializedAnnotationContent
{
  // Add your implementation here
}
Create the constructor
A default, generic constructor based solely on the documentId:
public SampleSerializedAnnotationContent(DocumentId documentId)
{
    this.documentId = documentId;
}
Implement methods
get Method
This method should return the list of Annotations of the document.
@Override
public InputStream get() throws InvalidAnnotationFormatException
{
    if (documentId == null)
    {
        throw new IllegalArgumentException("Invalid null documentId provided !");
    }
    // Add your implementation to get the Annotations by a call to your API to fetch Annotations
}
Update Method
This method takes a list of Annotations that has been updated and saved as a parameter.
Define here where and how to save these updated annotations.
@Override
public void update(InputStream inputStream)
            throws InvalidAnnotationFormatException, AnnotationCredentialsException, AnnotationNotAvailableException
{
    if (get() == null)
    {
        // Add your implementation to your API to create annotations in your repository
    }
    else
    {
        // Add your implementation to your API to update annotations in your repository
    }
}
Part 5.2: Create a new SerializedAnnotationContentAccessor class
An online sample is available here.
Note that you need to use the class defined above (SampleSerializedAnnotationContent) in the implementation, as detailed below:
public class SampleSerializedAnnotationContentAccessor implements SerializedAnnotationContentAccessor
{
    private static final Logger LOGGER = Logger.getLogger(SampleSerializedAnnotationContentAccessor.class);

    @Override public Collection<SerializedAnnotationContent> getAll(DocumentId documentId)
            throws AnnotationsNotSupportedException, InvalidAnnotationFormatException
    {
        LOGGER.debug("getAll annotations for documentId: " + documentId);
        List<SerializedAnnotationContent> annotations = new ArrayList<SerializedAnnotationContent>();
        annotations.add(new SampleSerializedAnnotationContent(documentId));
        return annotations;
    }

    @Override public SerializedAnnotationContent getForModification(DocumentId documentId, Annotation annotation)
            throws AnnotationsNotSupportedException, InvalidAnnotationFormatException
    {
        LOGGER.debug("get annotations for documentId: " + documentId);
        return new SampleSerializedAnnotationContent(documentId);
    }

}
Part 6: ARender configuration
- Build the JAR package via Maven.
The JAR file should incorporate the essential dependencies required for the connector to seamlessly integrate with the Document Management System (GED).
Similarly, the pom.xml file needs to include the necessary ARender dependencies to ensure the product functions correctly with the specified version. For an online example, please check this page
$> mvn clean install
- Place the JAR in the lib/ directory of ARender WEB-UI,
- Configure the use of the new AnnotationAccessor developed above:
  <bean id="sampleXFDFAnnotationAccessor"
        class="com.arondor.viewer.xfdf.annotation.XFDFAnnotationAccessor"
        scope="prototype">
      <property name="contentAccessor">
          <bean
                  class="com.arondor.arender.sample.connector.annotationaccessors.SampleSerializedAnnotationContentAccessor">
          </bean>
      </property>
      <property name="annotationCreationPolicy">
          <bean
                  class="com.arondor.viewer.client.api.annotation.AnnotationCreationPolicy">
              <property name="canCreateAnnotations"
                        value="${arender.server.annotations.can.create}" />
              <property name="textAnnotationsSupportHtml"
                        value="${arender.server.annotations.text.html.support}" />
              <property name="textAnnotationsSupportReply"
                        value="${arender.server.annotations.text.reply.support}" />
              <property name="textAnnotationsSupportStatus"
                        value="${arender.server.annotations.text.status.support}" />
              <property name="textAnnotationsCommentSupportReply"
                        value="${arender.server.annotations.text.comment.reply.support}" />

              <!-- For each annotation, show a list of security levels to choose from -->
              <property name="annotationsSupportSecurity"
                        value="${arender.server.annotations.text.security.support}" />
              <property name="availableSecurityLevels"
                        ref="availableSecurityLevels" />
              <property name="annotationTemplateCatalog"
                        ref="annotationTemplateCatalog" />
          </bean>
      </property>
  </bean>
arender.server.default.annotation.accessor=sampleXFDFAnnotationAccessor
Part 7: Deployment and testing
To test, follow these steps:
- Restart ARender.
- Open a new browser window and load the URL expected by the URLParser defined above.
- Example: http://localhost:8080/?id=1234
- The desired document should be displayed in ARender.
- Add an annotation to the document.
- Save.
- Expected Result:
- The annotation should be saved via the connector developed above.
- The annotation should be displayed on the document after saving or refreshing the page .
Debugging
Refer to this dedicated ARender logs page for debugging information.